Steps to Fix HP Printer Black Ink Issue – “HP print don’t print black” is a common issue that is faced by many users while working on HP printer. There are many reasons behind this error. If you are one who’s work is on hold because of this error then today you have landed at the right place. We, Tech Support Expert is providing Steps to Fix HP Printer Black Ink Issue. Also we will provide you the reasons behind the occurence of this issue. So that from the next time when this error occur you already know what is wrong and what to do.
Connect with Tech Support Expert for the realible printer solutions. You can call us anytime at our toll-free number 800-742-9005. If you want you can even drop us a mail at support@techsupportexpert.com.
What are the Main Causes of HP Printer Not Printing Black?
While using the printer i.e, when you are taking print outs you may face some issues. One of the most common issue is image being too dark. Below given are some the reasons behind the printer not printing properly:
- You must conisder the protecting tape. In case you are using a new cartridge then you should take care of the protecting tape.
- Check whether printer has sufficient ink. In case your cartridge is out of ink then you need to replace it with a new one.
- There are chances that your cable is not working properly which may results into the printer not working issue or printer not printing black issue.
Simple Steps to Fix HP Printer Not Printing Black Ink Issue
Tech Support Expert is here with the best solutions that will help you to remove the problem from the root. You just have to follow the steps one by one and soon your printer will be ready to print.
Step 1 – Re install the Printer Driver
If your printer is not printing black then try to uninstall and reinstall the printer software.
- First of all remove the printer from the driver list.
- Disconnect the cable from the printer if it is connected.
- Navigate to Control Panel
- Then, click on Devices and Printers, right click on the icon of printer and click on uninstall device.
- Now follow the on-screen instruction to complete the software removal.
- Now uninstall the print driver software
- In case your printer is connected to a computer via USB cable then disconnect cable from printer.
- Now search windows for features and after that click on Programs and Features in the list.
- Click on HP printer name in the list and then unintall it.
- If you see a user account control message then click on yes.
- Next follow the on-screen instructions to complete the software removal.
- Once the software is uninstalled, restart the computer.
- After following the steps to unisntall the print driver now go to the HP official website and install the latest version of drivers.
- Now check whether the printer is printing properly or not.
Step 2 – Examine the Ink Level of the Cartridge
Most probably all the HP printers have LCD touchscreens panels and on them you can easily check ink levels. Steps to check the ink level:
- Go to the windows and click on control panel.
- In the control panel navigate to the option Ink Levels.
Note: The steps to check the ink level are not same for all the printer models. So read the book that comes along with the printer which has all the information.
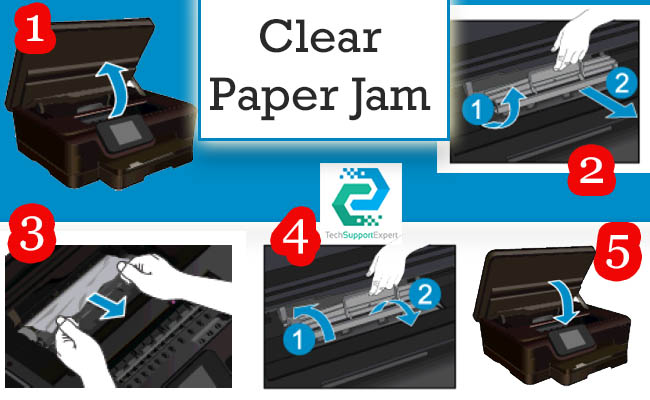
Step 3 – Remove the Plastic Tape from the New Cartridge
Usually the printer user forget to remove the plastic tape when they bring new cartridge.
- Firstly remove the black ink cartridge from the printer.
- Then, peel off the protective tape.
- If you are using the old cartridge then move on further and follow the troubleshooting steps.
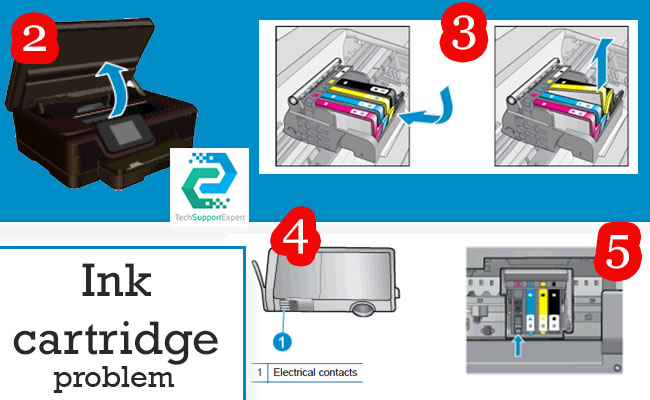
Step 4 – Clean the Ink Cartridge
Your printer may not print black if your cartridge is not cleaned properly.
- Clean the ink cartridge by using a cotton swab to remove the dirt and dried ink from the print header.
- Then also clean the printer heads.
Step 5 – Do Print Cartridge Alignment
Always make sure that to run “Self-Test Diagonistic” and “Print Cartrige Alignment” fix the issue of black ink not printing. In case you get an error message “Print Cartridge Alignment Failed” then you need to follow the troubleshooting steps:
- First of all insert the correct size and type of paper in the printer i.e, A4 size.
- Then press Setup button on Control Panel of printer.
- Now press Down Arrow to select Tools and then press Ok.
- Again press Down Arrow to select Align Print Cartridges and then press Ok.
- Next align the print head and print an alignment page.
All the above steps are quite simple and easy to follow. If you are still facing the error or you are stuck in between any of the step, without any hesitation give us a call at our toll-free number 800-742-9005.