Even in today’s digital world where information is stored and circulated seamlessly through different digital platforms, the need for physical documentation still has not entirely vanished. Many businesses and other organizations utilize SAP software to smoothly carry out various daily operations, manage data, and generate critical documents. Therefore, knowing How to Configure Printers in SAP can simplify this complex process. In this blog compiled by Tech Support Expert, you can easily explore the essentials of how to Configure a Printer in SAP.
Whether you’re new to SAP or a professional user looking to refine your printing processes this guide will walk you through every single detail required for configuring your printer in SAP.
Benefits of Configuring a Printer in SAP
Configuring a printer in SAP essentially means that the information produced within SAP, such as invoices, purchase orders, or reports, can be turned into paper copies for easy reading and sharing. Setting up a connection between the SAP software and a physical printer ensures that the documents and reports generated within the SAP system can be directly sent to and printed by your chosen printer. Some other benefits of Configuring a Printer in SAP are briefed below:
Convenience: Configuring a Printer in SAP is extremely beneficial in environments where people still prefer printed documents. It allows users to easily access and share information without having to rely on different digital platforms.
Efficiency: With the configuration, employees can easily get the print of required documents. This significantly reduces the need for manual data entry or transferring information to other devices.
Communication: Printed documents are often used for communication with partners, customers, and suppliers in many businesses. Configured printers help in maintaining smooth communication channels.
Accuracy: Printing documents from SAP reduces the chances of errors that might occur during manual copying or transcription.
How to Configure Printer in SAP
With the guidelines below, you will efficiently learn how to connect the SAP software and a physical printer. This blog will help you understand the significance of printer configuration in SAP and equip you with the knowledge and skills you need to carry out the process.
Step 1: Access SAP Customizing
- Log in to your SAP system with the appropriate user credentials.
- Navigate to the SAP Customizing screen. This can usually be accessed through the transaction code “SPRO.”
Step 2: Define the Output Device
- In the Customizing screen, navigate to “SAP Reference IMG” > “SAP NetWeaver” > “General Settings” > “Set Output Device.”
- Click on “Create” to define a new output device.
- Provide a name for the output device and specify the device type (e.g., printer model).
- Enter the printer’s physical connection details, such as the network address or printer server information.
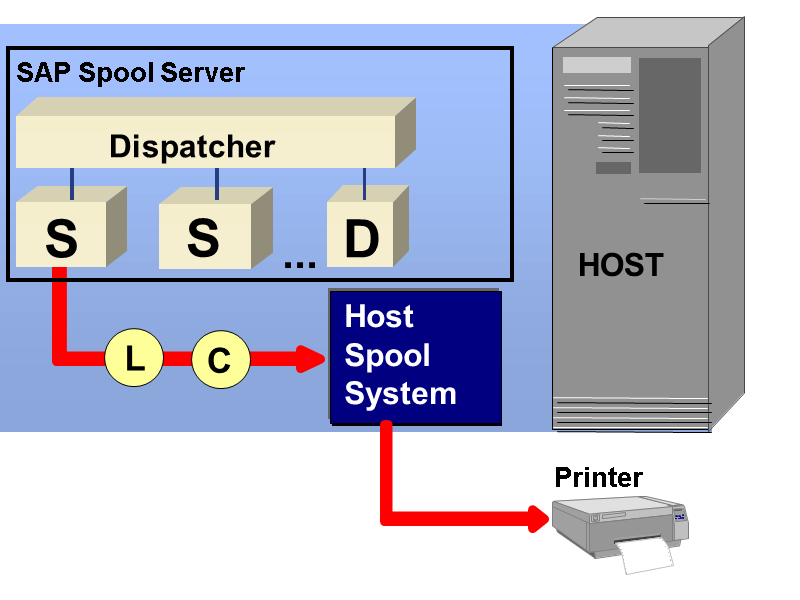
Step 3: Assign Output Device to SAP Spool Server
- Go back to the “Set Output Device” screen and select the output device you created.
- Click on “Assign Output Device” and choose the appropriate SAP spool server.
- Save your settings.
Step 4: Define Print Parameters
- Return to the Customizing screen and navigate to “SAP NetWeaver” > “General Settings” > “Set Printer Assignment.”
- Select the output device you defined in the previous steps.
- Specify print parameters such as paper format, print quality, and other relevant settings.
Step 5: Test Printing
- To ensure your configuration is working correctly, navigate to a report or document within the SAP system that you want to print.
- Select the “Print” option, and the system should prompt you to choose an output device.
- Select the output device you configured and initiate the printing process.
- Monitor the print job to ensure it’s successfully sent to the printer and produces the desired results.
Troubleshooting and Regular Maintenance
If the configuration of your printer does not produce the expected results, review your printer configuration settings for any errors. Check the connectivity between the SAP system and the printer, including network settings. You can also verify that the printer drivers are correctly installed and compatible with the SAP system.
To maintain and regulate keep track of your printer configuration settings for future reference. Timely update configurations as needed when you introduce new printers, change printer locations, or modify print parameters.
Conclusion
Using these steps you can easily configure a printer in SAP. Whether you’re an IT professional, a business manager, or a curious learner, through this blog you can quickly learn how to configure printers in SAP and enhance efficiency, accuracy, and communication within your organization. In case you face any difficulty in performing the configuration, you can contact Tech Support Expert for further support and expert guidance.


