Office 365 is the best Cloud Email solution, it not only help customer to be completely on the go. This article tells you how to add Exchange and Office 365 accounts to Outlook 2016 for Mac.
Add your first account
- In Outlook, select Tools > Accounts.

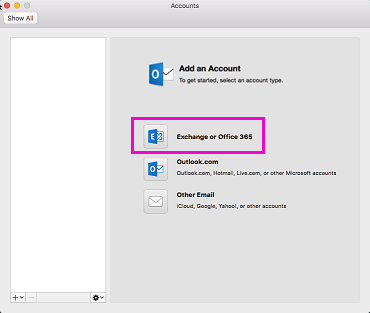
- In the Accounts box, select Exchange or Office 365. (If you don’t see this screen, it’s possible you already have one or more accounts in Outlook 2016 for Mac. Just click the + at the bottom of the screen to add another account.)

- Enter your email address.
- Choose your authentication method. If you have difficulty adding your account, check with your account administrator to see which authentication method you should use.
To Authenticate With Do This User name and password Click User Name and Password, and enter your credentials. (This is the most common method for authenticating Exchange accounts.) Kerberos Click Kerberos, and select an ID from the Kerberos ID pop-up menu.To create a new ID, click Create a New ID. Client certificate Click Client Certificate Authentication, and select a certificate from the pop-up menu. - Enter your user name and password for Exchange, and click Add Account. Outlook will detect your Exchange server automatically.If you’d rather enter your Exchange server name manually, clear the Configure automatically check box, enter the server name, and click Add Account. How do I find my Exchange server name?
- You might see a redirection message. If so, check Always use my response for this server > Allow.
- For Office 365 accounts, modern authentication is now supported. This enables additional layers of security such as multi-factor authentication. You’ll be asked to sign in to your Office 365 account via your organization’s sign-in page. You’ll only be prompted for the sign-in once.
- When the you’ve finished adding the account, it appears in the left pane of the Accounts box and Outlook begins downloading your messages and other items. A green indicator next to the account name means the account is connected.
How to Configure Office 365 in Outlook® 2010 Manually
Microsoft Windows® 10 Threat Protection Solution


