


How to Configure the DHCP Relay in TP-Link Switch? – In order to maximize the use of IP addresses, DHCP (Dynamic Host Setup Protocol) is frequently used to automatically assign IP addresses and other network configuration information to network devices. Between several subnets or VLANs, DHCP messages are processed and forwarded using DHCP Relay. The DHCP client transmits DHCP request packets, in order to request an IP address. The client will never be able to get an IP address from the DHCP server if they are not both in the same LAN since broadcast packet transmission is always restricted to one LAN. As a result, every LAN should have a DHCP server, which will raise the cost of network building and complicate central network management. Therefore, if you are also a DHCP Relay user and wants to learn How to Configure the DHCP Relay in TP-Link Switch?, then read along because we got the answer to your question.
Clients typically obtain IP via broadcasting DHCP packets throughout the local area network (LAN), and the server responds to client requests. This makes maintaining the DHCP server and clients in the same LAN vital. When you require several DHCP subnets, you must have multiple DHCP servers in the same LAN for each subnet, which can increase network costs and make the network more difficult to operate.
To address this issue, the DHCP Relay feature is used. It can send DHCP packets for various subnets. Consequently, the DHCP server can be shared by all subnets. Hence, we provide you the guide on How to Configure the DHCP Relay in TP-Link Switch?
 Any technical issues, such as How to Configure the DHCP Relay in TP-Link Switch?, will get a strong, quick, and detailed response from a Tech Support Expert. Because it is the leading provider of technical support services in the sector, the company is renowned for providing consumers with the best, most effective solutions. The organization is the industry leader thanks to its highly skilled technical workforce, impressive list of accomplishments, and unwavering commitment. Call 800-742-9005 or send an email to support@techsupportexpert.com if you are experiencing any kind of technical issues and would like them resolved as quickly as possible. We are here to help you and will do everything we can to meet your needs.
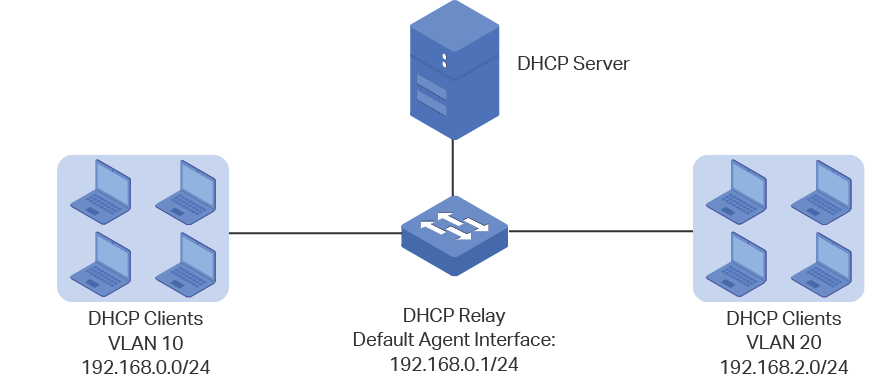
Procedure to Configure the DHCP Relay in TP-Link Switch
You require a DHCP server that lets you distribute across a single subnet. Take a TP-Link L2+ switch at this point. We are now going to provide the client with two separate subnets that are connected to the T1600G-28TS and 192.168.10.0. Now, let’s learn the steps to configure the DHCP Relay in TP-Link Switch:
Step 1: As soon as you log in, turn on the DHCP server and create two IP address pools on the T2600G-28TS. To enable it, navigate to Routing, DHCP server, DHCP server, and then enable it.
Step 2: Go to Routing, DHCP Server, pool Setting, and then enter the Network Address. Additionally, the mask must be sub netted. Default Gateway and Lease Time are therefore necessary. Select Create after that. Repeat the previous action and then create an IP address pool. Two address pools will now be available on the pool table.
Step 3: Configure your T2600G-28TS using static routing. You are instructed on how to return the packets to the customers. Go to Routing, Static Routing. Enter Subnet Mask and destination subnet. We will now configure the 192.168.0.10 address. It serves as the following hop in your routing. The DHCP server configuration is now complete.
Step 4: You must set up a different interface in the first step of these settings because the one in the T2600G-28TS disagreed with it. Select Interface after choosing Routing. Change its interface to 192.168.0.10 at this point. When prompted, enter the IP address 192.168.0.10 to log in.
Step 5: Subnets from different networks will then be split up into numerous VLANs. As a result, we must create two VLANs. You must now add ports 1/0/4, 1/0/6, and 1/0/8 to VLAN 10. The next step is to add ports 1/0/3 and 1/0/5 to VLAN20.
Step 6: The DHCP relay must then be turned on. The next step is to navigate to Routing, DHCP Relay, and then select Global Config. DHCP servers for VLANs are specified using DHCP server settings. The DHCP Relay configuration process is now complete. After that, determine whether or not this is working.
Step 7: Connect your computer to the numerous ports that are connected to them. Run CMD after which you must type the commands ipconfig/release and ipconfig/renew. A few results will now appear on the screen.
The clients will now appropriately obtain IP from the DHCP server.
On a Final Note..
If you want to learn How to Configure the DHCP Relay in TP-Link Switch?, we advise you to read this article thoroughly and implement every step carefully. Strictly adhere to the instructions for each stage and you will receive the greatest results. However, if you think you’ll need help with technology even after taking the aforementioned steps, get in touch with our IT specialists. We sincerely hope that you enjoy looking through our website and learn everything you need to know about How to Configure the DHCP Relay in TP-Link Switch? Contact support@techsupportexpert.com or call 800-742-9005 if you need more assistance from skilled experts.


